Tips&Techniques To Kick Ass Drawing

Today we are getting our hands dirty! I love drawing myself and I especcialy love paint. The downside is that I'm not a very clean worker, so I always get dirty hands and even arms. I want to share a couple tips&techniques that help me focus on the garments I want to draw instead of on the figurine. With the figurine (the human body) out of the way I feel much more free to explore different shapes. I think for home sewists, the biggest struggle is the difference between a fashion drawing and your own figure. So that's something we'll try to solve today!
What I really want to emphasize is the following: DON'T FREAK OUT if your drawings aren't perfect or turn out exactly the way you want at the first try.
Drawing is 80% watching the subject and 20% action. So if I manage to draw a design, I studied the design about 1000 times. And it still might be crap at the first attempt. So be brave and get to work!Paint yourself
 First we need to gather our supplies (see, it's like sewing!)
I recommend Gesso Primer, this is something you can buy at an Art Shop, but if you recentely painted your house you can use that primer too (if it's water based!)
You also need an old cloth (or a sock in my case), a cup with water, a paintbrush (not the ones for the wall!), some pencils and a base picture.
The best base picture is one on which you are standing as straight as possible. Try to find a picture in which you aren't wearing too many clothes. The less clothes you wear, the easier it is to paint a new outfit on top of them!
This is a picture of me in my Nettie Bodysuit. You don't need to print it in colour but you can. A tip: best to print it on an inkjet and not on a laserprinter! The primer will stick better with the inkjet printer.
Let's get started!
First we need to gather our supplies (see, it's like sewing!)
I recommend Gesso Primer, this is something you can buy at an Art Shop, but if you recentely painted your house you can use that primer too (if it's water based!)
You also need an old cloth (or a sock in my case), a cup with water, a paintbrush (not the ones for the wall!), some pencils and a base picture.
The best base picture is one on which you are standing as straight as possible. Try to find a picture in which you aren't wearing too many clothes. The less clothes you wear, the easier it is to paint a new outfit on top of them!
This is a picture of me in my Nettie Bodysuit. You don't need to print it in colour but you can. A tip: best to print it on an inkjet and not on a laserprinter! The primer will stick better with the inkjet printer.
Let's get started!

 Wet your paintbrush by dipping it into the water.
Dap it a bit dry on your cloth so it's no longer dripping.
Wet your paintbrush by dipping it into the water.
Dap it a bit dry on your cloth so it's no longer dripping.
 Now, get some paint on your paintbrush. I use the primer immediately from the jar. Make sure there isn't a huge lump of paint on your brush. You might want to remove some lumps by wiping it at the edge of the jar.

 Start to apply paint onto your picture. You want to paint the silhouette you are looking for by making strokes, not by outlining the silhouette first. If you use strokes, you will get a much nicer result in the end. Don't be scared to use strokes instead of an outline, you can do this!

 Go on until you are satisfied with the silhouette you created. It's not necessary to think about the details just yet. We'll fill those in later!
 Let it dry, let it dry, let it dry...
(Whatever you do, don't put it in the microwave, it might catch fire. Ask me how I know!)
Let it dry, let it dry, let it dry...
(Whatever you do, don't put it in the microwave, it might catch fire. Ask me how I know!) Clean out your paintbrush for now. Make sure you rinse it everytime you put it away so it does not get hard. Rinsing = key with paint. Dap it dry and store it flat or with the brush side up.
Onto the details now!
Clean out your paintbrush for now. Make sure you rinse it everytime you put it away so it does not get hard. Rinsing = key with paint. Dap it dry and store it flat or with the brush side up.
Onto the details now!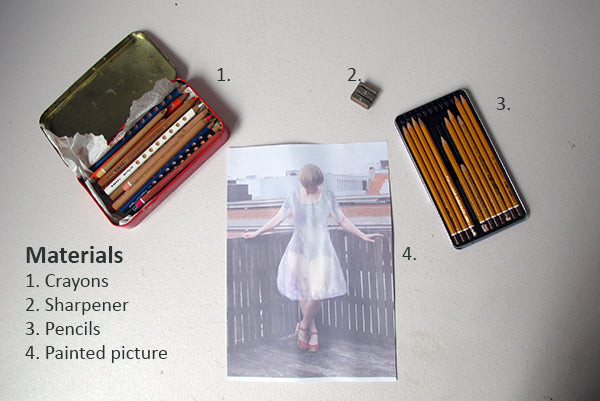 Gather the other materials such as crayons, a sharpener, pencils and your painted picture.
 Start drawing the silhouette lines and construction details onto your painted picture. Tomorrow I'll show you some books that can help you with how to draw construction details and silhouettes.
 Continue on until you have drawn the main style lines and details.
 Now, pick a colour and start filling your design with the desired colour and/or print.
 You can use multiple colours or shades of one colour to highlight details and give depth to your drawing.
 Go on until you are happy with your design.
 Admire your drawing. Send me a picture of it. ;-)
Trace It
As sewists we are quite familiar with tracing paper and today we are using it for our drawings. This technique is really quick and easy to do, so you can use it if you want to try out a couple different ideas. I like the fact that by drawing on tracing paper, you can also put different patterns underneath it to see what fabric print would be cool with your design. Let's get started For this technique you need crayons (optional, if you want to use colour), a sharpener, pencils, a base picture and tracing paper.
You want to find some high quality tracing papier (not the ones sold in sewing shops, even though you can use that it will not look as pretty!)
The base picture is again a picture with you as undressed as possible for easier design options!
For this technique you need crayons (optional, if you want to use colour), a sharpener, pencils, a base picture and tracing paper.
You want to find some high quality tracing papier (not the ones sold in sewing shops, even though you can use that it will not look as pretty!)
The base picture is again a picture with you as undressed as possible for easier design options!
 Place your sheet of tracing paper on top of your base picture.
 Start drawing onto the tracing paper. Follow the lines of your legs, arms and head.
 Draw the desired silhouette onto your tracing paper by following the points of your body as a guid. Shoulder seam at the shoulders, waistline at the waist...
 Fill in the details such as pockets, seamlines, ribbing...
 Finish your drawing by making sure you have drawn all the details, your arms, legs, head, shoes...
If your arms or legs ar resting onto something, maybe draw that too so there are no weird flowing limbs in your drawing.
Finish your drawing by making sure you have drawn all the details, your arms, legs, head, shoes...
If your arms or legs ar resting onto something, maybe draw that too so there are no weird flowing limbs in your drawing.
 Admire your result. I told you this technique was super quick!
Bonus Points for those who can guess which patterns inspired me for these two designs. Especially the second one is super easy! Let me know in the comments below if you have any questions, advice or ideas on the subject of drawing or if you recognise the pattern! Happy drawing!